VW 020 gearbox conversion to 02A/02J
It's been many times I was asked "What should I do regarding gearbox when swapped my car with more powerful and newer engine?".
This question arises to all Golf mk2, in some cases Golf mk3 or Passat owners when doing conversions. It happens because cars natively running ABF, AAA, ABV, AGU, AWW, AWP, AUE, BAM, APX you name it, came with gearboxes type of 02A, 02J where clutch is pressed using hydraulic cylinder instead of cable connected to clutch pedal like in Golf mk2 or Golf mk1. Other major circumstance is that 02A and 02J gearboxes when changing gears are operated using cable shifter. In this particular topic I'll assume we're talking about 4 cylinder engine and any 02J gearbox it came with. In my case that's an AGU 20vT engine with 02J 5 speed manual gearbox.
Since major differences are known, probably next question which comes to the head is... Why would I convert to 02A or 02J ? You may combine 20v engine with an old 020 gearbox surely, but I would not recommend doing it. Changes and upgrades ahead are not so tiny I must admit, but trust me, it's worth the effort. Benefits you gonna get are:
- 02A or especially 02J gearboxes can handle significantly higher power output. If you're planning to run ~250-300bhp I would not even think about an old 020 gearbox;
- 02J gearbox cable operated gear selector works 100x times more precisely comparing to 020 linkage operated mechanism;
- Fitting gearboxes mentioned above won't require any of mounting re-fabrication. VW for the win regarding this!
- All the 02J gearboxes I've seen are clean and not greasy like 020. Newer gearboxes are sealed better, my bet is;
- Nowadays there are diffuculties to source 020 gearbox in acceptable condition. Because of that, these sometimes even come at silly prices;
- There're no problems to source LSD like for any other VW gearbox;
- Internals like close ratio Syncro final drive still could by easily used;
- Gear selector in case of 02J is made of aluminum and it looks way better. Personally for me, a great installation is a thing to consider about. I mean you may fit it inside, on the tunnel, not in the tunnel where it belongs. And it'll look cool.
Like in any other situation there're pros&cons. Some of tiny disadvantages:
- Whole installation is heavier;
- There gonna be unused hole left in firewall;
- Some say that through cable operated clutch you're able to feel better when clutch's catching. To be honest I never had any issues with that.
On the list of disadvantages I did not mention a fabrication needed to fit everything and make it work :D That's the reason I made this how-to. Since you know the way it's not hideous anymore.
So let's start from must-have part list:
- 02A, 02J gearbox with clutch cylinder in it, shift tower, i.e. a complete one;
- Gear selector compatible with choosen gearbox;
- Clutch cylinder connected with clutch pedal;
- Pedal box from a VW model using hydro clutch. Passat B3/B4 or Corrado suits well;
- Master brake cylinder reservoir with outlet to source clutch cylinder with brake fluid;
- A hose to connect MBC reservoir with clutch cylinder;
- Another hose/pipe to connect clutch pedal cylinder with gearbox cylinder;
First of all make sure you have effortless access to places you gonna cut/drill. Remove an old shifter and linkage.

Take a pedal box and try to "install" clutch pedal cylinder to visualize where it should be located. That's an important moment as you must obtain place very precisely. If this is not granted you gonna kink cylinders pushrod what will cause difficulties to press pedal smoothly. When you source pedal box it won't have a flange needed to bolt clutch cylinder to. Just take a glance to how pedal box came in:

A flange. You need to fabricate it. I won't describe measurements I did, but I honestly suggest you to do multiple measurements and multichecks so you can press clutch easily and nicely. When requisite flange is welded and you know where center of longitudinal axis of cylinder is - cut a hole diameter 31-34mm.
I've seen few examples where lads fitted cylinder straight to firewall. Cylinder becomes bolted separately from pedal box. Firewall sheet is very thin and when you apply force by foot required to press cylinder - it starts twist with an entire firewall. As an outcome cylinder changes it's angle and brings problems using it. I strongly suggest to use more robust construction. In example I do represent everything comes tightened in one piece, I would say like a bunch of five. BTW I used 2mm thick metal sheet. Regarding flange you should end with something what looks like:

A step back, put cylinder in hole attach to pedal and assure cylinder's pushrod is able to move and travel freely. If it's ok, drill few more holes for cylinder bolts. Personally I have welded in hex nuts to serve as a thread:

Have brushed everything, primed with an epoxy and painted matt black to get an OE look :)


Cylinder moves as intended. Now we can move further and with cylinder removed - bolt a pedal box to firewall:

Use any tool to mark down a location of hole needed to cut in firewall. And remove pedal box again. Here we go:

Using same metal cut crown, cut and drill same holes as in pedal box:

When pedal box fitted back, everything should line up and make you able to insert cylinder. For now, enough with pedal cylinder and pedal box.
Next issue is gear selector, shifter, you name it. Just drill off spot welds and remove old shifter bracket:

I did weld old holes, primed it:

Later made some calculations how should I fit selector. Be aware that these selectors came in different cable lengths. Mine came from Audi A3 and it was long enough to place selector in OE place and still reach shift tower on the gearbox. Double check this before cutting:


Few more holes and it sits:

A view from underneath:


Take a notice that cables intersect slightly with tunnel construction, but I see no prob to cut some room for them:

At last connect shifter cables to shifter tower:

You can see pipe/hose routed from cylinder to cylinder:
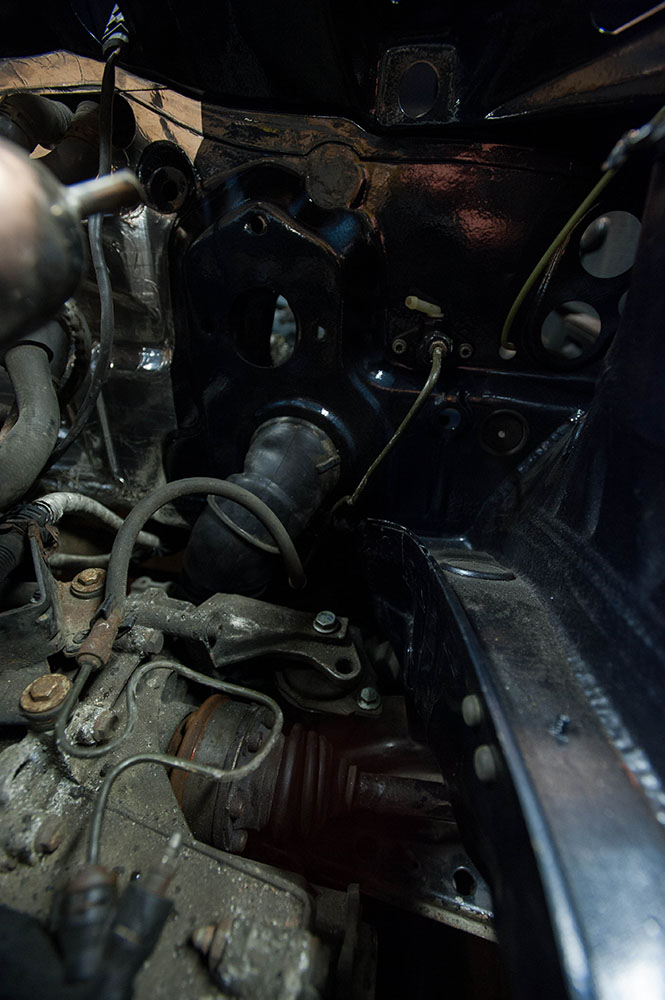
Cylinder on the firewall:

Painted firewall inside, got everything together:

Tunnel spot weld holes blanked, sealed and tunnel painted:

After everything fitted, linked and connected don't forget to re-align shifter.
Happy shifting!!
Hits: 79813